Connect Twilio — start here
Simple setup is the default. Enter your Account SID and Auth Token. Lead to Crew creates the API key and configures browser calling for Voice-enabled accounts. No manual permission checkboxes or callback addresses are needed.
Open your setup tabs
1. Find your two account details
- Sign in to Twilio and select the account that owns your business phone numbers.
- Open the account home page: Account Dashboard in the older console or Home in the newer console.
- Find Account SID (starts with AC) and Auth Token. Copy them directly into the matching Lead to Crew fields. Do not reset or rotate the token.
If you cannot find the token, use the Auth tokens tab on the API keys page. The advanced pictures below show both Twilio console menus. Complete any verification code directly in Twilio.
2. Connect with Simple setup
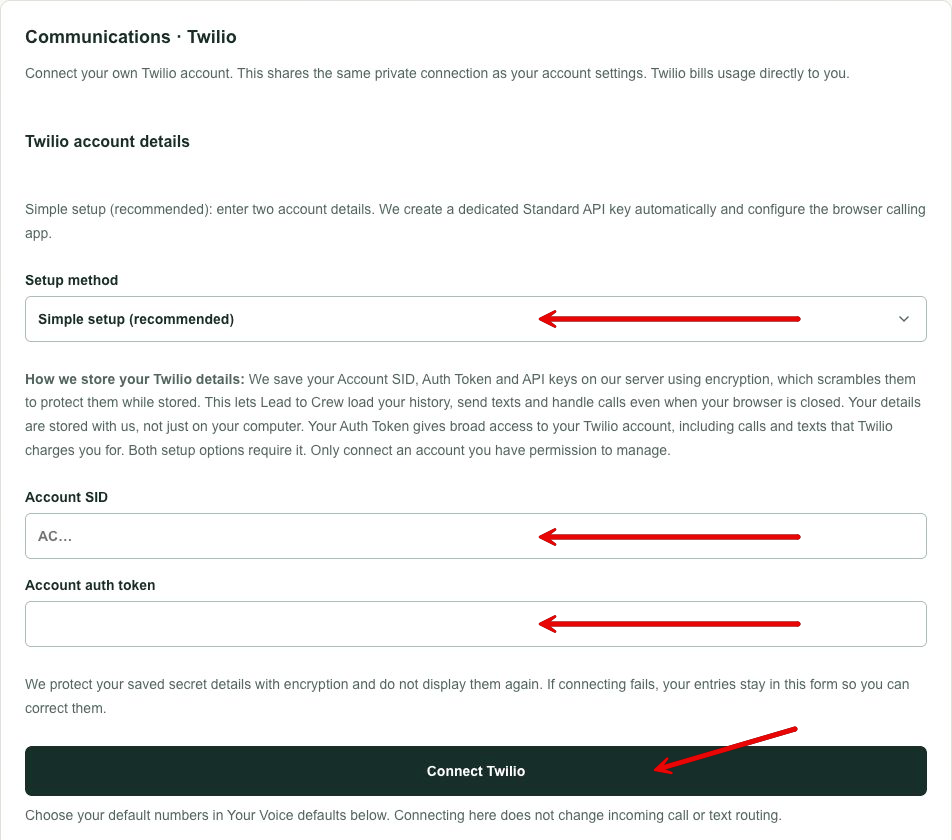
- In Voice setup, find Communications · Twilio. Leave Simple setup selected.
- Enter Account SID and Account auth token.
- Read the storage explanation, then click Connect Twilio. Keep the page open while setup finishes.
- Wait for the success message. Load your Twilio numbers under Your Voice defaults and save the business number you want to use.
What is stored, and why?
We save your Twilio account details and API keys on our server using encryption, which scrambles them to protect them while stored. We need them to load your history, send texts, handle calls and check that updates really came from Twilio—even when your browser is closed. These details are stored with us, not just on your computer. Your Auth Token gives broad access to your Twilio account, including calls and texts that Twilio charges you for. Both setup options require it.
Simple setup creates a dedicated Standard API key in US1 and a dedicated browser calling app for Voice-enabled accounts. A Standard key has broad API permissions except account and key administration. Existing keys and incoming call/text routes are left in place. Connecting does not buy numbers, enable geographic calling permissions or complete A2P/toll-free registration.
Disconnect removes the active Lead to Crew connection, but does not close your Twilio account or revoke keys there. Review and revoke dedicated keys in Twilio when no longer needed. The key created by Simple setup powers both regular features and browser calling; revoking it stops both. Do not revoke keys shared with another integration.
3. Try your phone or headset
- Open Calls & texts and choose your business number.
- For headset calling, open Calls → Use browser & headset, enter a number you control or someone expecting the test, and choose Call from browser.
- Allow microphone access. Confirm caller ID and audio both ways, then end the call. Keep this tab open while using browser audio.
- For Call my phone, save your personal receiving phone, answer it and press 1 to connect.
Already connected using an older/manual setup? In Voice setup → Call from your browser, click Enable browser calling automatically. If it is already configured, keep your existing setup.
Optional: receive calls in this browser
On Calls & texts, choose a business number and turn on Receive calls in this browser. Select a duration and keep the page open. Unanswered calls continue to the saved normal flow after about 10 seconds; turning receiving off restores the saved route. Browser answering bypasses your normal screening/AI flow for that call. Connecting alone does not turn receiving on.
Twilio bills call usage separately, including both the browser connection and customer phone call. Balance, trial limits, destination-country permissions and texting registrations still apply.
Advanced: use your own keys
Choose Advanced in the connection form to supply a dedicated API key SID and secret along with Account SID and Auth Token. The Auth Token is still stored encrypted on our server and still has broad access. Manual setup lets you choose the key and permissions; it is not local-only or an Auth Token-free connection.
Open manual setup instructions and Twilio screenshots
Connect Twilio — start here
Start here to connect your business numbers, texts, call history, existing recordings and calls through your phone. You only need the Restricted key in this guide. Headset calling is an optional next step.
Keep this guide open in one tab and Twilio in another. The pictures show where to click. Select any picture to make it bigger. You do not need to write code.
Twilio has two console designs. If you see Admin at the top, use the older-console instructions. If you see a small gear on the left, use the newer-console instructions. Your account may open either one.
Open your setup tabs
1. Find your API keys page
Sign in to Twilio. Choose the account that owns the business phone numbers you want to use. Your account name will be different from the pictures.
I see “Admin” at the top
- Click Admin near the top-right corner.
- Choose Account management from the menu.
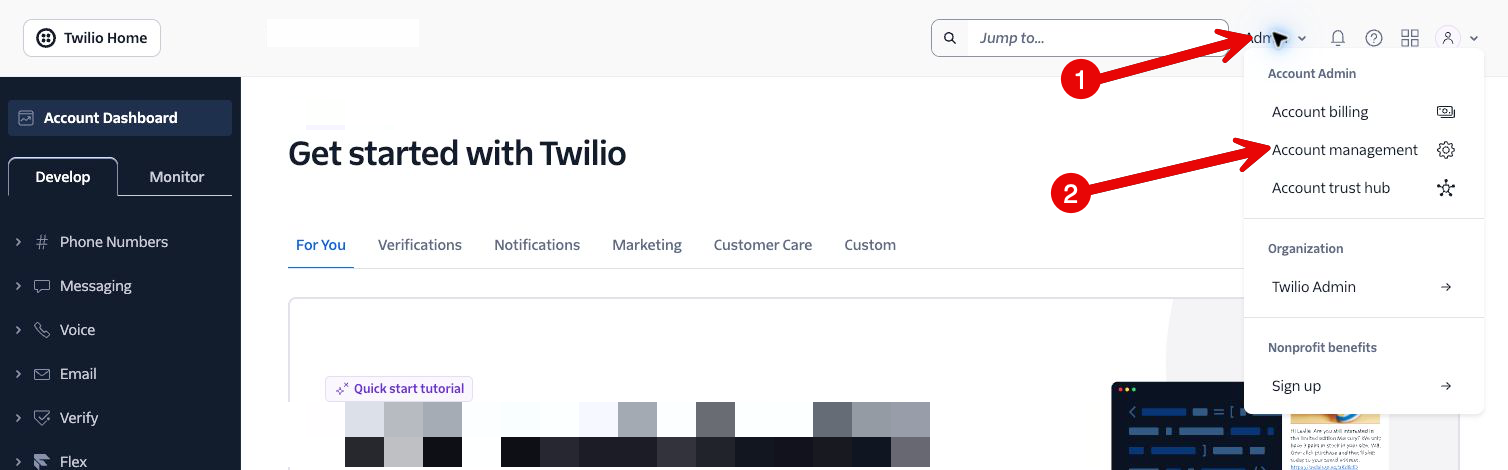
- On the left, find Keys & Credentials. Click API keys & tokens.
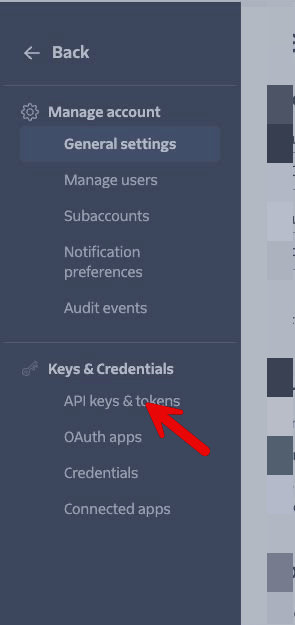
Try opening the older console’s API keys page directly. Twilio may ask you to sign in or enter an emailed verification code. Complete that in Twilio, then return here.
I see a gear on the left
- Click the small gear icon on the left to open Settings. If the sidebar shows icons only, hover over them to see their names.
- Click Account settings.
- Click API keys & auth tokens.
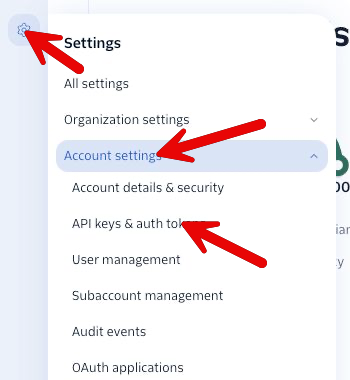
Checkpoint: you should now see a page about API keys. Select United States (US1). This is the connection region, even if you work in another country.
2. Connect your regular calls and texts
This part connects your business numbers, history, texts and phone bridge. Browser calling has its own optional guide.
A. Find your two account details
- Open the Twilio account home page: Account Dashboard in the older console, or Home in the newer one.
- Find Account SID and copy it. It begins with AC.
- Find Auth Token. Use its copy button to copy it privately into Lead to Crew’s Account auth token field. You can also find it under the API page’s Auth tokens tab.
These are account details. The API key and its secret are different values created next. Do not reset or rotate your account Auth Token.
B. Create a key for the regular connection
- Return to the API keys page from part 1.
- Click Create API key (some older screens say Create new API key).
- For the name, enter Lead to Crew Voice.
- Set Key type to Restricted. Confirm United States (US1).
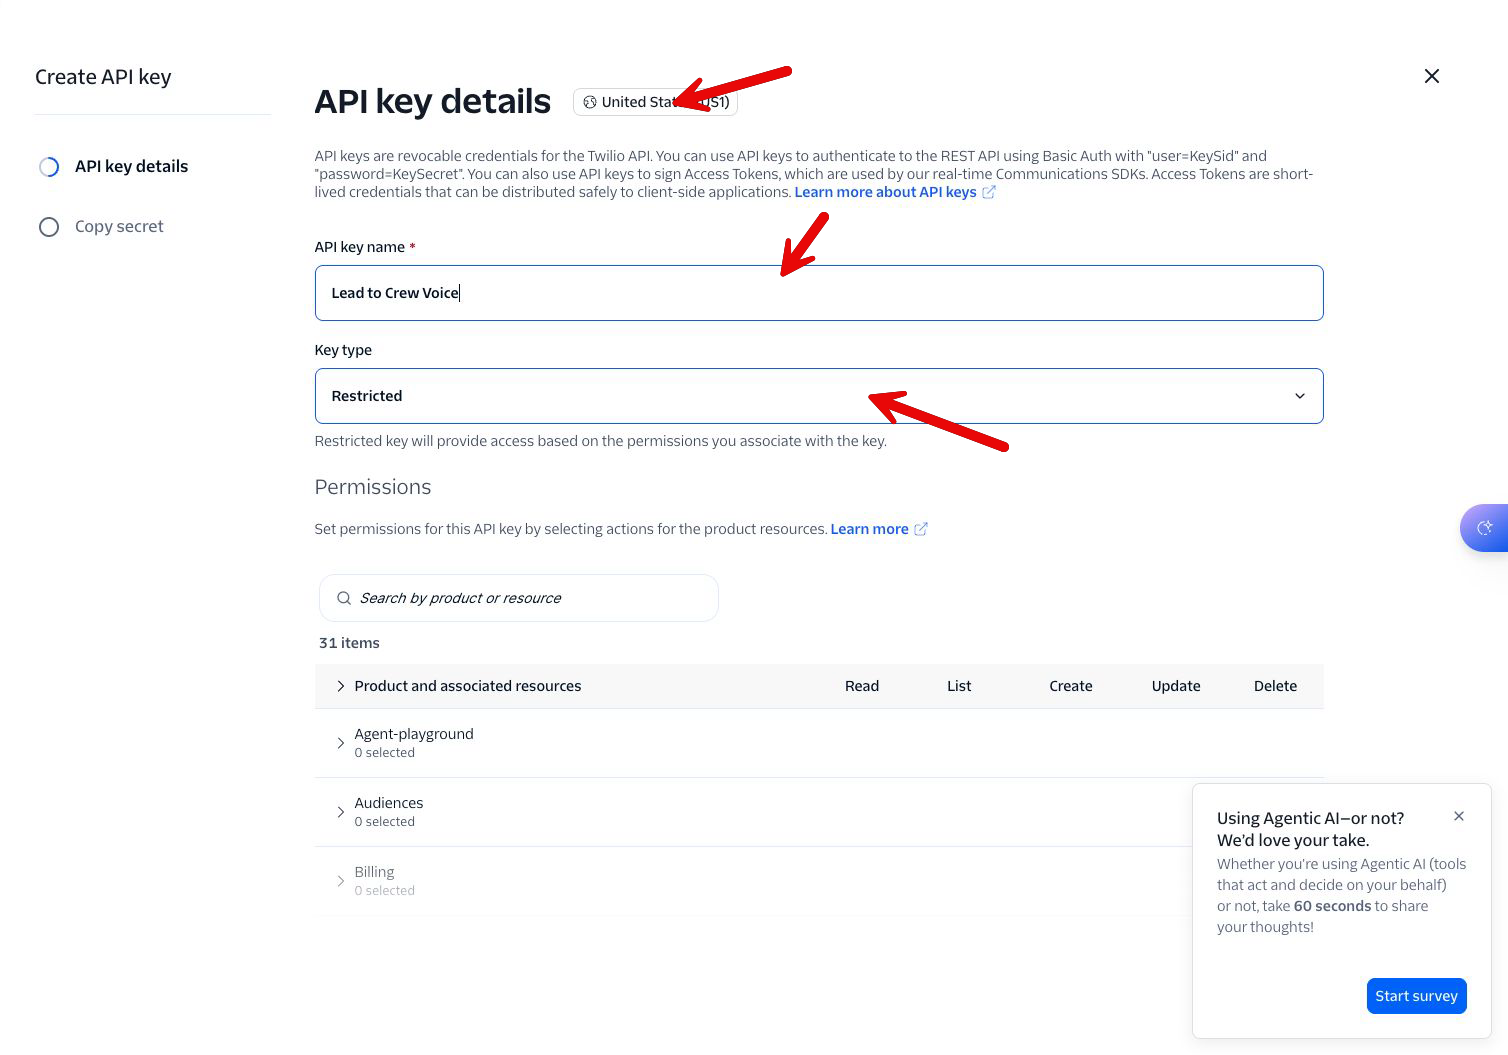
C. Check these permissions
Permissions are the checkboxes that let Lead to Crew load numbers, read history or start a call. Use the small arrows to expand each product and its resource groups. Select the checkboxes on the final resource row listed below.
| Expand these groups and find this row | Check these actions |
|---|---|
| Phone-numbers → active-numbers | List |
| Voice → Calls → calls | Create, Read, List |
| Voice → Recordings → recordings | Read, List |
| Messaging → Messages → messages | Create, Read, List |
| Messaging → Messages → messages.media | Read, List |
Example: recordings. Type recordings in Search, expand Voice, then Recordings. On the lowercase recordings row, check Read and List. Use Voice, not Video. The row called calls.recordings is a different resource.
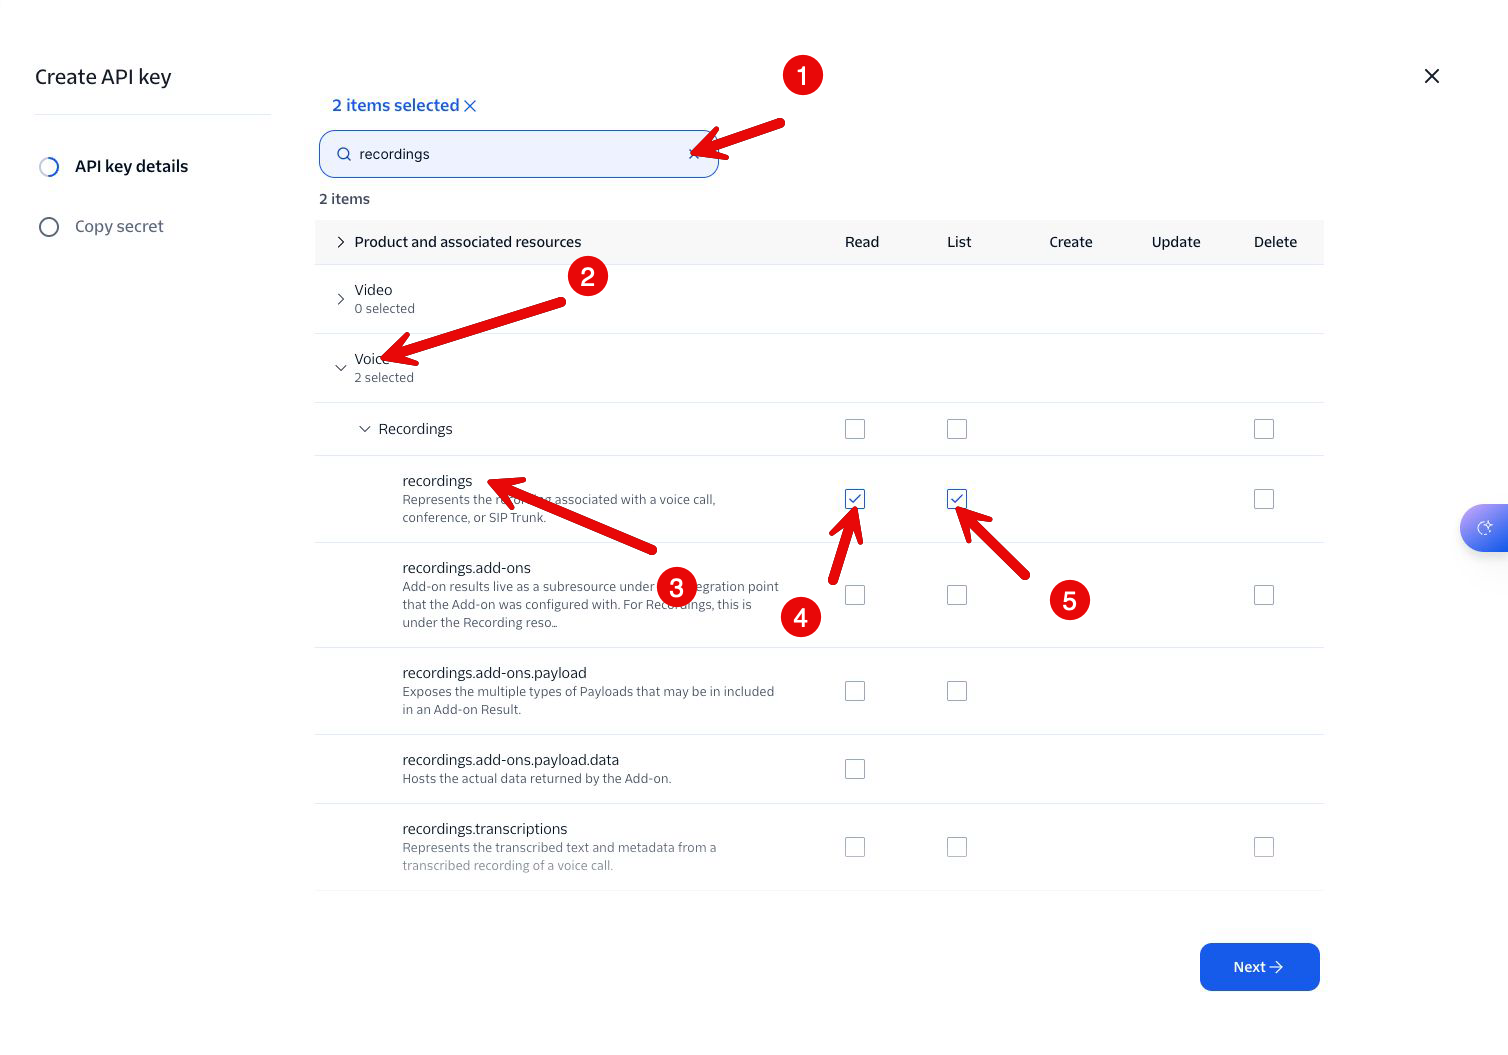
- Repeat for every row in the checklist. Clear Search between resources. If a group closes after you check a box, expand it again to inspect your selections.
- Finish Twilio’s key creation flow. In the newer console, use Next to reach the secret step. If you are editing an existing key, click Save.
- Keep the new secret screen open. Twilio shows a new key’s secret only once.
Already have a dedicated Restricted key and its secret? Open its name, then Permissions → Edit to add missing actions. Preserve extra permissions if that key also serves your CRM or another integration.
D. Put the four values into Lead to Crew
In Voice setup, find Communications · Twilio. Match each field:
| Lead to Crew field | Copy this from Twilio |
|---|---|
| Account SID | The account’s SID, beginning with AC |
| Account auth token | The account Auth Token from step A |
| API SID key | The new Restricted key’s SID, beginning with SK; may be called Client ID |
| API secret | That same key’s Secret or Client secret |
- Click Connect Twilio. Wait for a successful connection message.
- Under Your Voice defaults, click Load / refresh Twilio numbers.
- Choose your business number and save your defaults. Your personal receiving phone is used for Call my phone; browser mode uses your microphone instead.
Checkpoint: your owned business numbers load. This confirms the connection; try the features you plan to use before relying on them.
3. Check your connection
- Open Calls & texts and choose your business number.
- Open Calls and choose Call my phone. Confirm your personal receiving number and the number of someone expecting your test.
- Start the call. Answer your phone and press 1 to connect to the other person.
- Confirm the business caller ID and audio both ways, then end the call.
- Check the call history, message history and existing recordings you intend to use. Only send a test text to someone who agreed to receive it.
Twilio bills usage separately from your Voice subscription. Incoming forwarding, AI receptionist routing and Make.com scenarios have their own setup.
Want to talk through your headset instead? Your regular connection is now complete. Follow the separate Add browser & headset calling guide when you are ready. It is optional.
If your screen looks different
I cannot find Settings
Look at the top-right for Admin. That is the older console. Follow Admin → Account management → Keys & Credentials → API keys & tokens. Settings is the gear on the left in the newer console.
Twilio asks for an email code
Open the email sent by Twilio, type the code directly into Twilio and click Verify. This is Twilio checking access to a sensitive account page.
I cannot find Create API key
Check that you are on the API keys tab, not Auth tokens, and in the right account. Your Twilio account role may need an owner or administrator to create credentials for you.
My key’s secret is missing
Twilio only shows a new secret once. If you no longer have it, create a separate replacement key, save it in the correct Lead to Crew form and verify it works before retiring the old key.
Email support@leadtocrew.com with the step number and visible error. Never send API secrets or Auth Tokens. If you send a screenshot, cover credentials and every real phone number.
Actual Twilio screens checked November 12, 2026. Examples were captured without saving new credentials or changing routing. Private account information is obscured. Twilio’s API key documentation.
Need help?
If automatic setup fails, check the account details, your account access and the visible error. If a request timed out, check Twilio for a newly created Lead to Crew key/app before trying again. Contact support rather than repeatedly creating resources. Never send Auth Tokens or API secrets in support messages. Cover credentials and real phone numbers in screenshots.
Email support@leadtocrew.com.